Monday, March 09, 2015
Wilderness Systems Ride 135 Seat Riser Mod
Quick walkthrough of my custom made riser for the low seat on my 2012 Wilderness Systems Ride 135. Enjoy, let me know if you have any questions!
Monday, March 11, 2013
An Inside Look at the Bass Pro Shops Pro Qualifier Baitcast Reel
Last year I started looking into upgrading a large majority of my fishing gear. Most of it was old hand me downs from my Dad or cheap stuff that I had bought as a teenager. One of the first purchases I made was a Bass Pro Shops Pro Qualifier. It was definitely not an impulse purchase devoid of any research. On it's surface, it looked like an excellent buy with literally all of the features I was looking for, with plenty of reviews to prove its worthiness. I looked through hundreds of reviews and comparisons, and made what was in my mind, a fairly educated decision to purchase one with confidence. There were a few nagging thoughts in my mind, mostly from some of the negative reviews. At the time though, they didn't bother me enough to keep me from purchasing one, especially at the $80-100 pricepoint it's usually offered. Over the months since though, I've been apprehensive about the durability of these little reels. Would they stand up to years of use, hundreds of fish, and how hard would they be to obtain service or parts? What I've found lately along with what I've discovered on my own is that I really don't think I have anything to worry about, although I still wasn't able to find pictures of the guts and components that make this reel operate as it should. As a result, below is a compilation of my findings through research and a brief "field strip" of my own Pro Qualifier.
To begin with, my primary concern was with service and parts. Would they be easy to get serviced if I couldn't do it on my own, and would parts be accessible and reasonably priced? After making a few calls to the Sevierville, TN Bass Pro Shop as well as reading through this VERY detailed 5 year review of the Pro Qualifier, the answer is YES. Parts are very readily available, and while you may have to buy a whole sideplate assembly to replace one bearing or piece of the braking system, that assembly is VERY cheap (<$20). That's just a small example, your experience can and will vary depending on what part(s) you need. BPS has you covered either way, and given the pure amount of Pro Qualifiers sold and the size of its parent company, the parts will be around for a long time.
It should be noted that I am by no means tooting on Bass Pro's horn. I have no affiliation with them, and I was a bit skeptical about the 675 reviews that have been posted on the Pro Qualifier. What has actually been kind of bugging me is that many of the reviews are several years old. The Pro Qualifier has surely been updated at least a little bit over the years. I'm hoping someone who reads this will be able to confirm if and when the PQ has last been updated, just to make sure the last update coincides with the oldest review and that the reviews haven't been simply combined over several iterations of the PQ. You won't see this on some of the other reels posted on their site, which might have something to do with manufacturers changing the model numbers on new iterations of their products. Either way, it's my opinion that the reviews seem to be relatively fair across the board for the Pro Qualifier, albeit a bit excessive. Also, the PQ is a VERY popular reel in the BPS stores and online, so the reviews may pretty much evenly coincide with the pure volume of sales.
Back to the durability of the Pro Qualifier, there are a few people out there that have knocked it's durability, but there are also more than a few people out there that handle their gear like a gorilla. That leads me to leave those opinions out of my overall decision on deciding whether the PQ is worth my money and time. There are also a few people out there that absolutely love their PQ's, they own a dozen of them and they all work perfectly. I would think that even with the best reels out there, it's expected to have at least one or two issues from time to time. That's just called being realistic. Even the best products fail, so I will never think of anything as perfect and infallible. As a result, I throw out the reviews that I think tend to embellish a bit too much. What does this all come down to? A fine middle ground that tells me pretty much what I would expect, a reel that comes as close to perfect at the $80-100 pricepoint as I'm going to get.
This leads me to the final part of my in depth look at the Pro Qualifier, what exactly is inside these little guys? Many people complain about a reel having plastic gears and question their durability. I will go ahead and confirm everyone's suspicions about plastic gears, they are NOT durable....but they aren't meant to be, especially in this particular application. As you will notice in the pictures below, the PQ does have plastic gears, but they are there to drive the worm gear that moves the line leveler back and forth. The main drive gears are brass and I expect them to last many years. It's my belief that BPS went with plastic gears in order to protect the line leveler system from excessive damage in the event the reel is dropped and the line lever takes a direct hit. It has happened to me in the past with a different reel, and it has ruined the worm gear and line leveler assembly to the point that I just had to scrap an entire reel. It's my hope (and I would suspect BPS's) that since there are plastic gears driving the line level system, those will strip or fail before any major damage is done to the actual worm gear or other part of the line leveling system. It's a lot cheaper and easier to replace a couple plastic gears versus scrapping an entire reel because of a borked line leveler or similar. As mentioned above, it's very easy to get those gears serviced or replaced in the event they are needed.


Beyond the scope of durability and the other stuff I've already discussed, the Pro Qualifier seems to be made very well and is packed with premium features. From the one piece aluminum frame and aluminum drag star to the super handy dual braking system, the PQ is a very well rounded reel for the money. As mentioned earlier as well, I put it in the $80-100 pricepoint. While the $20 range looks odd at first, the reason it's there is because the PQ often goes on sale for $80, although it's normally priced at $100. Bottom line, it's an excellent deal for $100....for $80, it's even better!
Monday, February 18, 2013
Bluegrass Yakmasters
This is going to be an extremely exciting year for kayak fishing in Kentucky, and it will largely be due to the formation of a new club that goes by the name of Bluegrass Yakmasters. I began hearing rumors of these guys back in the fall. My Dad messaged me one day and told me to look them up on Facebook, a bunch of guys he works with had been talking about them. I looked them up and did the usual "Like", but didn't see much activity until closer to the end of the year. They had apparently just went official and were in the process of pulling together sponsors and a 2013 tournament schedule, and they definitely did not disappoint.
One of the major sponsors is HOOK1. HOOK1 has quickly become one of the leaders of the kayak fishing movement, providing all of the most highly sought after and sport specific products that kayak fishermen are looking for. What impresses me most about HOOK1 is their customer service and overall presence in the sport of kayak fishing. I've dealt with them several times when ordering accessories for my boat, and will be placing an order here soon for a new boat for my wife. I directed several of my buddies to HOOK1 for their needs, and one of them was especially impressed just lately with how quick they received their brand new "Knot Right Camo" Wilderness Systems Ride 135. 13 hours from order to receiving their boat at a local shipping hub! (It should be noted though, that this time can vary according to your shipping location. It helps that in this instance, the boat was going from TN to KY, but the 13 hour time frame was still impressive regardless. It takes most places 24 hours just to process an order, much less ship it out, so this is still an impressive feat!)
Chad Hoover, the frontman of HOOK1, is basically everywhere. When he's not filming episodes of KayakBassinTV, he's in the HOOK1 shop answering phones and taking orders, or he's out fishing or attending trade shows. In all fronts, Chad and the rest of the HOOK1 crew have been great advocates for kayak fishing, and is recognized by many as being one of the driving forces in bringing more visibility and interest to the sport.
Other sponsors lined up for the Bluegrass Yakmasters include Shimano, Hobie Fishing, NuCanoe, Kayak Angler Magazine, Cabin Creek Bait Company, BullfrogBaits.com, Logic Lures, Power Team Lures, Bending Branches, NRS, The Rod Glove, and ALE81. It's especially exciting to see some of the local companies such as Bullfrog Baits and Cabin Creek Bait Company on there. Those guys make some great baits and it'll be great to see some local places get more exposure.
I'm also very happy to see NRS and Bending Branches step up as a sponsor. I've used NRS for years as my go-to supplier of whitewater gear, and I LOVE my Bending Branches Angler Classic paddle (check out my review HERE). It's also impressive to see a big company such as Shimano step up as a sponsor. It goes to show, these guys mean business!
Now that we're done giving some much deserved credit to the sponsors, lets talk about the 2013 tournament schedule for the Yakmasters! There are several locations on the schedule that most people are familiar with or have at least heard of. Lake Cumberland and Green River Lake are well known for their quality of fishing, but I'm even more excited to be fishing the Elkhorn Creek and Cedar Creek Lake. The Elkhorn is quickly becoming THE go-to spot for smallmouth bass fishing. It's been proclaimed by many as the best creek in the state, if not the nation, for smallmouth bass fishing.
Cedar Creek Lake is quickly becoming one of the premier lakes for bass fishing. It was built with the sole purpose of being a trophy bass lake, and is already popping up on the radar as one of the top bass fishing lakes in the US, coming in at number 30 in the 2006 Field and Streams list of “The 35 Best Bass Fishing Waters in the U.S.” To give you an idea of just how impressive this achievement really is as well as how well this lake has been managed, Cedar Creek was impounded in 2003. It took just 3 YEARS to make the list as one of the best, and it's only gotten better since! I will be posting a completely separate article on Cedar Creek soon with more info and recent pictures/videos of this impressive body of water.
Here's the official 2013 Tournament Schedule for the Bluegrass Yakmasters, as copied from their Facebook page.
One other thing that has been announced on the Bluegrass Yakmasters facebook page, is the raffle that will be after the 1st Annual Bluegrass Yakmasters Open Tournament on April 6th...
As I mentioned above, I'll be writing another post exclusively on Cedar Creek Lake, but I'll also be writing periodically on some of the other locations listed on the tournament schedule. It's going to be a big year for kayak fishing here in Kentucky, so you'll definitely want to stay tuned...maybe even come out and fish with us! The 1st Annual Open Tournament on April 6th already has 43 people listed as "going" on its facebook page, with well over 50 expected to register, it's going to be a huge event! Click HERE to check out the Bluegrass Yakmasters, and HERE to check out the 1st Annual Bluegrass YakMasters Open Tournament.
See you on the water!
One of the major sponsors is HOOK1. HOOK1 has quickly become one of the leaders of the kayak fishing movement, providing all of the most highly sought after and sport specific products that kayak fishermen are looking for. What impresses me most about HOOK1 is their customer service and overall presence in the sport of kayak fishing. I've dealt with them several times when ordering accessories for my boat, and will be placing an order here soon for a new boat for my wife. I directed several of my buddies to HOOK1 for their needs, and one of them was especially impressed just lately with how quick they received their brand new "Knot Right Camo" Wilderness Systems Ride 135. 13 hours from order to receiving their boat at a local shipping hub! (It should be noted though, that this time can vary according to your shipping location. It helps that in this instance, the boat was going from TN to KY, but the 13 hour time frame was still impressive regardless. It takes most places 24 hours just to process an order, much less ship it out, so this is still an impressive feat!)
Chad Hoover, the frontman of HOOK1, is basically everywhere. When he's not filming episodes of KayakBassinTV, he's in the HOOK1 shop answering phones and taking orders, or he's out fishing or attending trade shows. In all fronts, Chad and the rest of the HOOK1 crew have been great advocates for kayak fishing, and is recognized by many as being one of the driving forces in bringing more visibility and interest to the sport.
Other sponsors lined up for the Bluegrass Yakmasters include Shimano, Hobie Fishing, NuCanoe, Kayak Angler Magazine, Cabin Creek Bait Company, BullfrogBaits.com, Logic Lures, Power Team Lures, Bending Branches, NRS, The Rod Glove, and ALE81. It's especially exciting to see some of the local companies such as Bullfrog Baits and Cabin Creek Bait Company on there. Those guys make some great baits and it'll be great to see some local places get more exposure.
I'm also very happy to see NRS and Bending Branches step up as a sponsor. I've used NRS for years as my go-to supplier of whitewater gear, and I LOVE my Bending Branches Angler Classic paddle (check out my review HERE). It's also impressive to see a big company such as Shimano step up as a sponsor. It goes to show, these guys mean business!
Now that we're done giving some much deserved credit to the sponsors, lets talk about the 2013 tournament schedule for the Yakmasters! There are several locations on the schedule that most people are familiar with or have at least heard of. Lake Cumberland and Green River Lake are well known for their quality of fishing, but I'm even more excited to be fishing the Elkhorn Creek and Cedar Creek Lake. The Elkhorn is quickly becoming THE go-to spot for smallmouth bass fishing. It's been proclaimed by many as the best creek in the state, if not the nation, for smallmouth bass fishing.
Cedar Creek Lake is quickly becoming one of the premier lakes for bass fishing. It was built with the sole purpose of being a trophy bass lake, and is already popping up on the radar as one of the top bass fishing lakes in the US, coming in at number 30 in the 2006 Field and Streams list of “The 35 Best Bass Fishing Waters in the U.S.” To give you an idea of just how impressive this achievement really is as well as how well this lake has been managed, Cedar Creek was impounded in 2003. It took just 3 YEARS to make the list as one of the best, and it's only gotten better since! I will be posting a completely separate article on Cedar Creek soon with more info and recent pictures/videos of this impressive body of water.
Here's the official 2013 Tournament Schedule for the Bluegrass Yakmasters, as copied from their Facebook page.
--- April 6th, 1st Annual Bluegrass YakMasters Open Tournament @ Cedar Creek Lake For the following 'Qualifying' events, participants must be a registered club member
--- April 27th @ Lake Cumberland
--- May 18th @ Green River Lake
--- June 8th @ Elkhorn Creek*
--- June 22nd @ Stoner Creek
--- July 27th @ S. Fork of the Licking River
--- August 10th @ Elkhorn Creek*
--- August 24th @ Beaver Lake
--- September 28th @ Guist Creek Lake
--- October 26th & 27th Bluegrass YakMaster Classic Championship @ Cedar Creek Lake+
* Tournament will be joined with the Elkhorn Creek Fishing Series, and will be open to the N. Fork, S. Fork, and Main Stem.
+ To fish in the Classic Championship, club members must participate in 5 of 8 Qualifying events.
For the coveted Angler of the Year Title and healthy prize package members will be trying to earn as many points as possible through the season. Members will receive 'Participation Points' for every event they fish. Members will also receive 'Placement Points' for how well they finished. Anglers can count all 'Participation Points' but only their best 5 'Placement Points' toward that total.
We will factor in water and weather conditions before each event to ensure safety of our participants.
One other thing that has been announced on the Bluegrass Yakmasters facebook page, is the raffle that will be after the 1st Annual Bluegrass Yakmasters Open Tournament on April 6th...
"BIG Announcement: We are going to have a raffle after the open. The Grand Prize will be a Wilderness Systems Ride 115 rigged by Chad Hoover of HOOK1. http://www.wildernesssystems.com/product/index/angling/angling_kayaks/ride_angler_2012/ride_115_angler_2012/ You can purchase tickets 1 for $10 or 3 for $25. Additionally if you sign up as a member at or before the open you will receive 1 ticket as well! Everyone has a chance to win this and other great prizes but you must be present to win!!! "
As I mentioned above, I'll be writing another post exclusively on Cedar Creek Lake, but I'll also be writing periodically on some of the other locations listed on the tournament schedule. It's going to be a big year for kayak fishing here in Kentucky, so you'll definitely want to stay tuned...maybe even come out and fish with us! The 1st Annual Open Tournament on April 6th already has 43 people listed as "going" on its facebook page, with well over 50 expected to register, it's going to be a huge event! Click HERE to check out the Bluegrass Yakmasters, and HERE to check out the 1st Annual Bluegrass YakMasters Open Tournament.
See you on the water!
Wednesday, August 29, 2012
DIY First Aid Kits, Sort Of...
As with all adventures, you need or should be prepared for everything. Many things get overlooked or forgotten. They're usually seemingly little things that are negligible or trivial in nature, that is until you need them the most. Two of the most common are toilet paper and first aid kits. For now though, we'll discuss first-aid kits.
I looked through the whole gamut of first-aid kits, from the expedition kits for 5 or more people, to little kits that one would normally find at a dollar store. I was never quite satisfied with what I found, so I opted to create my own. I should probably start off with saying that when it comes to going on a full on expedition with a few other people and staying for a few days or longer, one of the expedition kits provided by Adventure Medical Kits would actually serve quite well. The majority of my trips are overnighters or days trips, so I didn't really need quite that many supplies. The problem is that in some of the smaller kits made for overnighters or day trips, they just have the bare bones bandaids and alcohol wipes.
Given all of that, when creating my own I started with a small kit. I used a small premade kit mostly for the handy little zipper case, then crammed some more stuff in there. I started with a little Coghlan's Trek I that you can buy from Walmart or any outdoors store. It only had the typical little bandaids, medical tape, and alcohol wipes. Hopefully that's all you will ever need, but we don't usually plan our accidents around hopes. If we did, we would obviously never have them in the first place. The good thing about the little Trek I pouch is that it had plenty of room for more supplies. I opted to pack it with a few other supplies just in case.
1. Mirror for signaling and self-checking any facial wounds
2. 2 Gauze pads for more serious abrasions and cuts
3. 2 Knuckle bandaids, I will probably double that to 4 since knuckle abrasions and cuts are the most common for me.
4. 2 Fingertip bandaids, I will also probably double these to 4 since fingertip cuts are also common.
5. An assortment of several medium and small bandaids, as well as several of the little wound closure strips (the technical name escapes me for some reason)
6. A moleskin for blisters, which has saved my toes more than once!
7. Athletic or medical tape, for helping secure bandaids or gauze pads.
8. An assortment of peroxide and alcohol wipes
9. A couple packets of sting relief, not really needed, but very welcome.


I also carry a small bottle of basic pain relievers and allergy meds separately, but make sure you or the people in your group aren't allergic to any of these meds. All of this stuff packs into my little first aid pouch quite well and it's still small enough to hold in the palm of my hand. I simply stick it in one of my drybags or usually in a spare pocket in my tackle bag. I've only had to use mine a couple times, but I've always had what I needed to at least take care of small injuries until I can get out of the backcountry. In the event of bigger injuries, I can usually improvise with objects around me to create what I need to stabilize an injury then control the bleeding (if there is any) with the assortment of bandages in my little kit. These skills were learned in a certified wilderness first-aid course, which I very highly recommend!
That's basically it for my little kit that I carry 90% of the time. If you're looking to put your own together or purchase one straight off the shelf, do your research and read up on the various products reviews out there, then get out there and take a first aid course. Hopefully you'll never need to use what you've learned, but you never know what will happen. Be safe and go prepared!
Friday, August 17, 2012
DIY Kayak Scupper Plugs
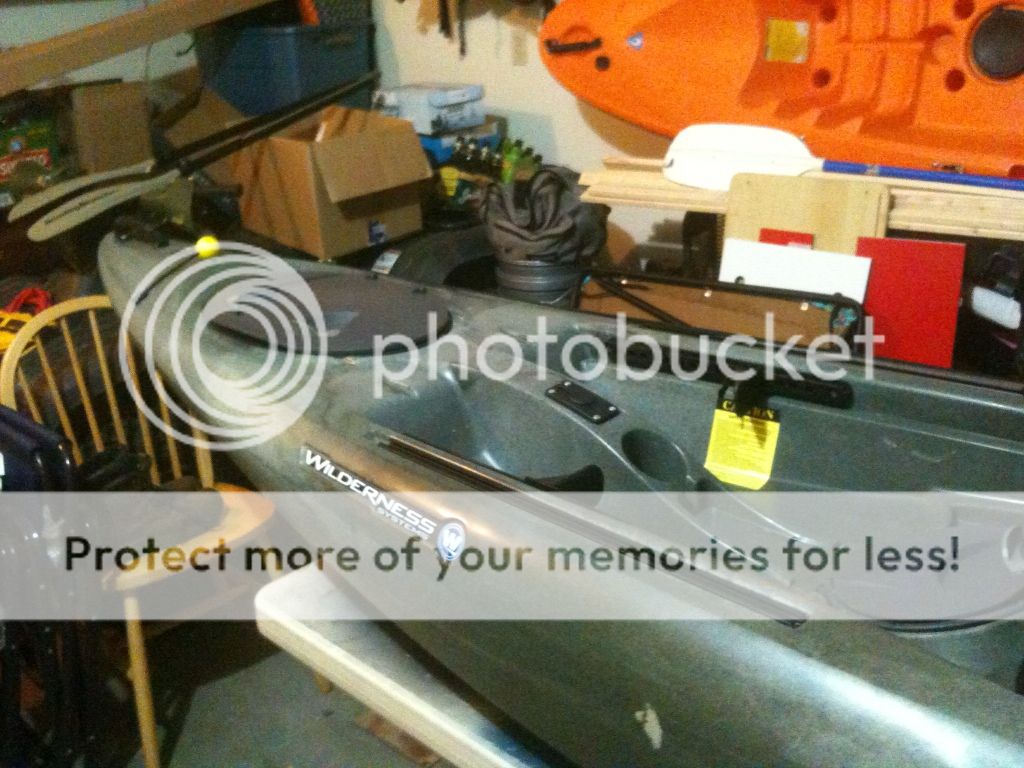
As most may notice, a large majority of SOT kayaks have scuppers. If you're not sure what a scupper is, it's essentially a hole (or set of holes) intentionally molded into a sit-on-top kayak that allows water to drain out. They're especially useful if it's raining or when you take on water when running a rapid. They're not so useful when you're on flatwater and they allow a little water into the boat or in my case, foam build up from whatever "nutrients" might be in the water. The scuppers in the rear tankwell of my Ride 135 take on a little bit of water when I have my seat slid all the way back, which effectively soaks some of my tackle. It's not a huge deal, but it can be annoying on flatwater. Thus, enter the scupper plugs...
There are factory and aftermarket made scupper plugs that will fit virtually every SOT kayak out there, but they can get kind of pricey, especially when you're having to buy 6 or 8 of them to keep your boat completely dry on-deck. I opted to do it my own way. There are a variety of ways to make your own scupper plugs. You can carve out pieces of a foam yoga block, a big piece of packing foam, pool noodles, etc. I opted to use foam practice golf balls. They're cheap, easy to cram in the scuppers, stay put pretty well, and they work just as good as a conventional purpose-made scupper plug. They typically run around $5 for a pack of 12, so it's a cheap and easy mod to do that will keep you and your boat dry on flatwater.
Check out the video for more info...
Friday, August 10, 2012
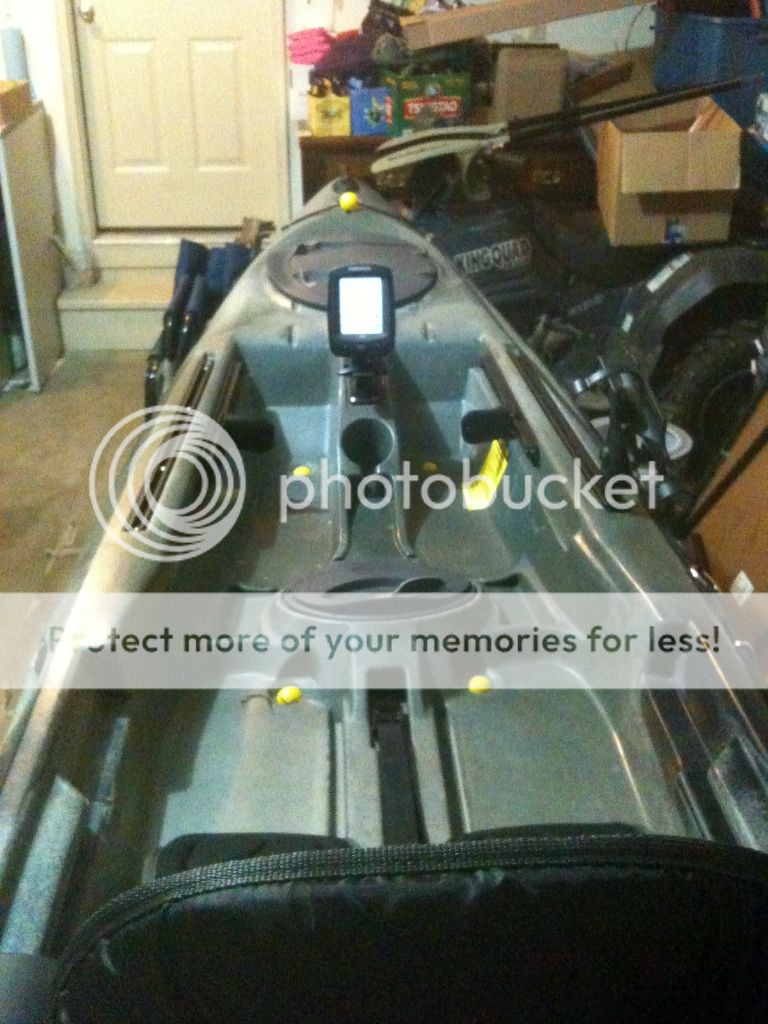
Quick and Easy DIY Mount for a Humminbird PiranhaMax 160 Fish Finder
Once I got the initial setup on my boat with all of the rod holders and anchor trolleys, I contemplated adding a fish finder. A lot of people out there choose not to add a fish finder to their fishing kayak, mostly because they fish rivers and a fish finder is of little use and just gets in the way. Fish finders will work ok on larger rivers, but for many it's just not worth the trouble. My goal was to make it as little trouble as possible. I fish a lot of smaller lakes and reservoirs, and it would be nice to at least see the depth and temperature of the water I'm fishing in. Finding actual fish is a nice perk as well...
I opted to go with the Humminbird PiranhaMax 160 that AustinKayak.com carries. It has a dual-band transducer for 20 and 60 degree angle readings, allowing a good wide view of what's below you. It also has a very nice backlight and is waterproof. I'll get around to posting an in-depth review soon of the PiranhaMax 160, but I was once again impressed by ACK's prices, shipping, and customer service. They're actually one of the few retailers I trust that carry the 160 (most others only carry either the 150 or the 170 for some odd reason). I considered the 160 a steal for $90 shipped, especially given the dual band transducer, backlight and weatherproofing. I didn't want to go with something too expensive, mostly because I only really needed basic functionality for now. I may change my mind sometime in the future as I fish more lakes and really get to researching thermoclines, but the little 160 fits my needs perfectly for now.
I wanted to mount my recently purchased PiranhaMax 160 in a way that it was easily removable for when I do not want it or need it on river and creek trips. I researched a few ways to mount it by purchasing adapters for a rod holder base, but in the end I decided to make my own. The total cost? About 50 cents.
I was going to purchase a mount made specifically for the Piranhamax series by Scotty, which is very nice, but it didn't have the option of routing the cables through the actual mount, which is ultimately what I wanted. I was then going to do the same as Paul from Palmetto Kayak Fishing and make a custom mount base like his, but it also wasn't designed to have the cables routed through the mount.
I decided to start with a Scotty Flush Mount Bracket, which has a nice low profile and a plug that you can remove from the bottom for, in my case, routing cables. I still wasn't sure how I was going to interface the base of the fish finder to the flush mount bracket, until I got to peering at the bottom of the fish finder's base. As it turns out, below the hole in the base of the fish finder, there is a 1/2-1/4" long tube or shaft that extends down. The circumference of that little tube appeared to be the same as the outer circumference of 1/2" PVC. I tried a 1/2" PVC coupler and it fit perfect! Snug enough that it takes a pretty good grip to pull it back off, but one could probably secure it with a little GOOP or Lexel for added security. I then cut a small piece of 1/2" pvc (maybe 2.5 to 3 inches long) to go in the other end of the coupler, long enough to fit in one end of the coupler and extend down into the bottom of the Scotty flush mount bracket.


As evident from the pictures, I painted it gloss black (the visible portion anyways) to give it a nice sleek look that matched the fish finder and flush mount. The 1/2" pvc fits down into the flush mount base perfect. It has a little "play" at first, but once you work it past the notch that's down in the flush mount bracket, it locks in pretty decent with enough resistance to keep it from moving around or falling out if you happen to flip your boat. As an added measure of security, I may eventually drill a small hole through both the pvc shaft and the shaft of the flush mount big enough to put a small lynch pin or PTO pin through. Keep in mind that if one does go with that method of securing their fish finder to the base, pull the cables before you drill the hole, then push them back through after drilling, and use a small enough pin that won't pinch the cables when you push it through to lock it all in place.

Once everything was secured, I routed my transducer and power cables up through the base and plugged them into the PiranhaMax 160. [Pro-Tip: Run the transducer cable up first, then the power cable] When I'm not using the fish finder, I simply pull the cables back down into the hull and secure them with a twist tie, then flip the rubber cap down on the flush mount to keep water out or stick a Scotty rod holder in there.
I'm currently working on creating a waterproof battery box, to power my fish finder and a few other accessories that I plan on adding on later. The box will be secured in the center of the hull between the two "towers" formed by the scupper holes (Ride 135 owners will know what I'm talking about. As for the transducer, I opted to "glass" it to the hull using a carved out foam block and some Lexel. I'm not sure how I'll like the transducer mounted like that though. I've heard it has no signal loss, but it does throw the water temp reading off a bit. If it becomes a huge issue, I'll opt for a flip down transducer mount. For now though, this setup should work ok for me, now I just need to get it on the water and try it out this weekend!
More pictures


Friday, August 03, 2012
New Phase 3 AirPro Elevated Seat for the Wilderness Systems Ride Series
This just in from the 2012 Outdoor Retailer Show..
Looks like the rumors were true, this will be really boost the Ride series! A higher seat will give you a better vantage point when fishing as well as make it easier to stand and sit. For those wondering about the stability with a slightly higher center of gravity, the Ride series is so stable it shouldn't even be an issue. This is just a prototype in the video, so it should be interesting to see if they do any more modifications before it's released to the public.
Check out Chad Hoover's quick overview in the video below.
Subscribe to:
Posts (Atom)